Dhiraj Kandel
Managing DirectorSchedule a free consultation with our expert counselors to discuss your study
An I-20 form, officially called the Certificate of Eligibility for Nonimmigrant Student Status, is a document issued by a SEVP-approved school in the USA after you are accepted and meet the school’s requirements. International students use the I-20 form to pay the SEVIS fee, complete the student visa process, attend the F-1 or M-1 visa interview, and enter the United States as a student.
After an SEVP-approved school accepts you, it issues Form I-20, which you must present during your student visa interview. For Nepalese students planning to study in the USA, understanding the I-20 form is very important because it connects your university admission, SEVIS record, visa application, and travel documents.
A SEVP-certified school issues the I-20 form through its Designated School Official (DSO). The DSO checks your admission status and financial documents before creating your SEVIS I-20 form. SEVIS means Student and Exchange Visitor Information System. It tracks international students and exchange visitors in the United States.
A student does not create the I-20 form by themselves. You receive it only after the school accepts you and confirms that you meet the required conditions.
The general process looks like this:
A normal admission letter is not the same as an I-20. The admission letter confirms academic acceptance. The I-20 confirms visa eligibility for study purposes.
The I-20 form is required because it connects your U.S. university admission, SEVIS record, and F-1 student visa application. It proves that you have been accepted by a SEVP-approved school and that your details have been entered into the Student and Exchange Visitor Information System.
In simple terms, the U.S. government uses the I-20 form to confirm that you are applying under the correct student visa category and that your study plan is linked to an approved U.S. school.
Before applying for an F-1 student visa, most F-1 students must pay the SEVIS I-901 fee. The official SEVP fee website explains that Form I-901 is used to pay the fee for prospective F-1, F-3, M-1, M-3, and J-1 nonimmigrants.
Your I-20 contains your SEVIS ID, which is needed for this step. Students should always check the latest SEVIS fee amount and payment instructions from the official U.S. government website before paying.
The I-20 form is also needed when completing the DS-160 online visa application. Students applying for F, J, or M visas are asked to provide their SEVIS ID, which is printed on the I-20 or DS-2019. The DS-160 may also ask for the school or program address, which should be available on the form.
This is why you should keep your I-20 beside you while filling out the DS-160 form to avoid mistakes in important visa details.
Students must bring their signed Form I-20 to the U.S. student visa interview. The U.S. Department of State lists Form I-20 as one of the required documents for F-1 and M-1 student visa applicants.
The visa officer may use the I-20 to check your school name, program, start date, tuition estimate, funding details, and SEVIS record. However, receiving an I-20 does not guarantee visa approval. You still need to show that you meet the visa requirements.
Even after your F-1 visa is approved, you should carry your signed I-20 when travelling to the United States. At the U.S. port of entry, you may need to present your passport, visa, and Form I-20. A visa allows you to travel to a U.S. port of entry, but the final entry decision is made by U.S. Customs and Border Protection.
The I-20 form contains your personal, academic, SEVIS, school, and financial details. You should check every detail carefully before using it for your visa process.
| I-20 Detail | What It Means | Why It Matters |
| Student name | Your legal name | Must match your passport |
| SEVIS ID | Your unique SEVIS record number | Needed for SEVIS fee and visa application |
| School name | Your U.S. institution | Shows where you plan to study |
| School code | SEVP school identifier | Confirms school registration in SEVIS |
| Program name | Your academic or vocational program | Shows your field of study |
| Education level | Bachelor’s, master’s, associate, language program, or vocational level | Helps define your study category |
| Program start date | Date your course begins | Helps plan visa timing and travel |
| Program end date | Expected completion date | Shows study duration |
| Estimated cost | Tuition, living costs, and other expenses | Helps prove financial readiness |
| Funding information | Personal, family, sponsor, scholarship, or loan details | Supports your financial documents |
| DSO signature | School official authorization | Makes the form valid for visa use |
| Student signature | Your confirmation | Required before the visa interview and travel |
Your passport name, date of birth, program, and funding details must be accurate. A small mistake can create delays in the I-20 form for the student visa process.
Many students get confused between the I-20, F-1 visa, and SEVIS fee. They are related, but they are not the same thing.
| Term | Meaning | Who Issues or Manages It? | Why It Matters |
| I-20 Form | Certificate showing you are eligible to apply for F-1 or M-1 student status | SEVP-approved school / DSO | Needed for SEVIS fee, DS-160, visa interview, and travel |
| F-1 Visa | Student visa for academic study in the USA | U.S. Embassy or Consulate | Allows you to travel to a U.S. port of entry and request admission as a student |
| SEVIS Fee | Government fee connected to your SEVIS student record | U.S. Department of Homeland Security / SEVP | Must usually be paid before visa processing |
A simple way to understand it:
You can get an I-20 form after a SEVP-certified U.S. school accepts you and confirms that you have enough financial support to study and live in the USA. The school’s Designated School Official, also known as the DSO, issues the Form I-20 after reviewing your admission and financial documents.
Here is the usual process:
First, you need to apply to a U.S. school approved to admit international students. Choose universities that match your academic background, budget, preferred course, location, and long-term career goals.
Once the university reviews your application, it may offer full admission or conditional admission. This means the school has accepted you into a program, but you may still need to submit certain documents before the I-20 is issued.
Before issuing the I-20 form, the school usually asks for proof that you can cover tuition fees, living costs, and other study-related expenses. These documents may include bank statements, education loan letters, scholarship letters, proof of income, or sponsorship documents.
The university will also need your correct personal information, including your passport details. These details are used to create your SEVIS record, so students should make sure their name, date of birth, and passport information are accurate.
After checking your admission and financial documents, the school’s DSO will issue your Form I-20. Some universities send the I-20 electronically, while others may provide instructions based on their own process.
After receiving your I-20, carefully check your name, SEVIS ID, school name, program name, start date, estimated cost, and funding details. If everything is correct, sign the form before using it for your visa process.
Once you have your I-20, you can use it to pay the SEVIS I-901 fee, complete the DS-160 visa application, book your visa interview, and prepare your student visa documents.
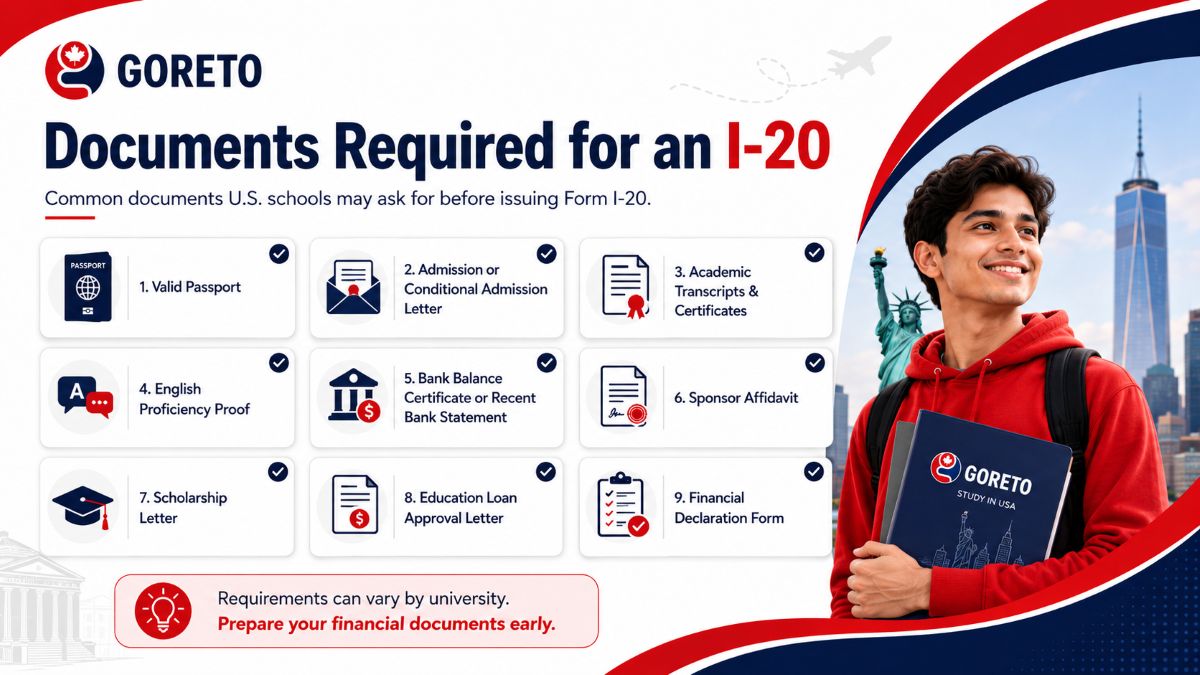
The I-20 form requirements can vary depending on the U.S. school, program level, course type, and how you plan to fund your studies. In most cases, universities ask students to submit academic, identity, and financial documents before issuing the Form I-20.
Common I-20 form requirements include:
For Nepalese students, it is better to prepare financial documents early because many U.S. schools require proof that you can cover at least the estimated first-year cost of tuition, living expenses, and other study-related expenses. However, the exact amount and accepted documents can differ from one university to another.
No, you generally cannot apply for an F-1 student visa without a Form I-20. The I-20 is one of the required documents because it proves that a SEVP-certified U.S. school has accepted you and created your SEVIS record.
You need the I-20 to pay the SEVIS I-901 fee, complete important details in the DS-160 visa application, and attend your student visa interview. Without it, the visa officer cannot properly verify your school, program, start date, SEVIS ID, and estimated cost of study.
Yes, you can change universities after getting an I-20, but you must follow the correct SEVIS and university process. You cannot simply use one university’s I-20 to study at another university.
If you receive a better offer from another SEVP-certified school before your visa interview, you should request a new I-20 from the new university and make sure your SEVIS and visa application details match. If you have already paid the SEVIS fee, check whether your fee can be transferred to the new SEVIS record before paying again.
If your F-1 visa has already been approved or you have already entered the USA, the process can become more complex. You may need to work with the Designated School Official, also known as the DSO, at both schools to transfer your SEVIS record properly.
Nepalese students should review the I-20 before paying the SEVIS fee or attending the visa interview.
Check these details:
A mismatch between your I-20, passport, DS-160, and financial documents can create confusion during the visa process.
Many students face delays or confusion in the F-1 visa process due to minor errors on their I-20 form or supporting documents. The I-20 is an important student visa document, so every detail should be checked carefully before paying the SEVIS fee, completing the DS-160, attending the visa interview, or travelling to the USA.
Here are some common mistakes to avoid:
Student visa preparation is not only about collecting documents. It is about making sure your admission details, financial documents, SEVIS information, and visa application all tell one clear, honest, and consistent story.
Understanding the I-20 form is an important step, but it is only one part of your study journey in the USA. From choosing a SEVP-approved university to preparing financial documents, paying the SEVIS fee, completing the DS-160, and getting ready for the F-1 visa interview, every detail matters.
If you are planning to study in the USA from Nepal, speaking with an experienced study-abroad advisor can help you avoid common mistakes and prepare your documents with greater confidence. Get proper guidance before starting your student visa process so your admission, I-20, SEVIS record, and visa documents are clear and consistent.
An I-20 form is an official document issued by a SEVP-approved U.S. school after an international student is accepted and meets the school’s requirements. It confirms that the student is eligible to apply for F-1 or M-1 student status in the USA.
Yes, an I-20 form is required for an F-1 visa. Students need it to pay the SEVIS I-901 fee, complete the DS-160 visa application, attend the student visa interview, and travel to the United States.
The I-20 form is issued by a SEVP-certified U.S. school through its Designated School Official (DSO). Students cannot create the I-20 themselves. They receive it only after the school accepts them and verifies the required documents.
Common documents required for an I-20 form include a valid passport, admission letter, academic transcripts, proof of English proficiency if required, bank statement or balance certificate, sponsor documents, scholarship letter, education loan approval, and the school’s financial declaration form.
No, getting an I-20 does not mean your U.S. student visa is approved. The I-20 only makes you eligible to apply for the visa. Final approval depends on your visa interview, financial documents, academic background, study plan, and overall visa eligibility.

From choosing the right country to finding scholarships and housing — our counselors will guide you at every step.
Choose the right country based on your goals
Find courses that match your career plan
Get guidance on colleges and universities
Plan your finances, scholarships & part-time jobs
Plan your abroad stay & post-study plan

Schedule a free consultation with our expert counselors to discuss your study

Schedule a free consultation with our expert counselors to discuss your study